Configure the Controller
The controller is configured using the Controller Properties dialog box.
Procedure
- In the Project Explorer, right-click the new controller to open the menu and click Properties.
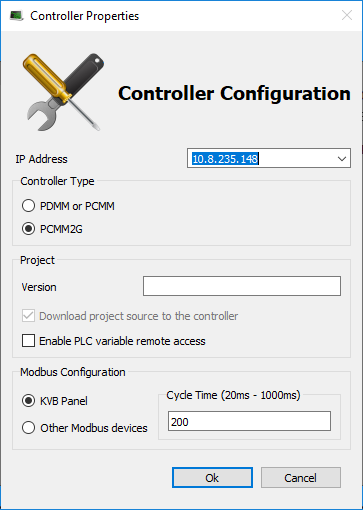
- Choose the Controller Type.
-
-
The correct Controller Type must be selected before compiling the application.
This is because the PLC code generated for the AKD PDMM or PCMM controls and the PCMM2G have different endianness.
AKD PDMM / PCMM files are big endian.
PCMM2G files are little endian.
A warning opens if the application is started with an incompatible controller type. - Define the IP Address.
- For the KAS Runtime Simulator, enter the local host IP address: 127.0.0.1.
- For the AKD PDMM or PCMM enter the IP address of the controller (e.g., 10.155.100.150).
- The default IP address is 192.168.0.1.
- This is the same default IP address on the PCMM or AKD PDMM controllers.
Verify that controller is accessible by the KAS-IDE machine.
See FAQ Setup for IT issues.
- Do not use leading zeroes when entering an IP address.
The connection to the controller automatically fails if leading zeroes are used.
Example: Use 10.2.3.40 instead of 010.002.003.040.
- Optional: Specify a version number (the string can be composed of any character).
-
-
Versioning is useful to make improvements to the application and if a version control system is needed.
The version is saved in your project file.
See Use a Version Control System for more information. - Optional: Choose whether the project's source code should be downloaded to the controller.
This is enabled by default and your preference is saved with the project.
Disabling this option means a comparison of source on the controller and in the IDE is not available. - Optional: Choose whether PLC variables are read/written via an HTTP connection.
This requires that the source be downloaded to the controller.
By default this option is disabled so unauthorized changes may not be made. -
-
Recompile the project before downloading it to the controller.
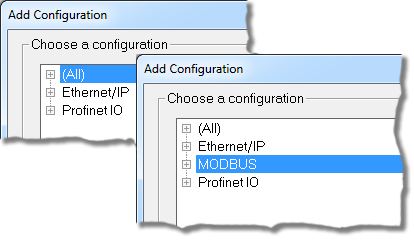
- Select whether Modbus goes to a KVB Panel or is handled by another Modbus device.
- Set the Cycle Time (i.e., the communication update frequency).
See Modbus Slave for more information. -
-
- If KVB Panel is selected there will be no node to add a Modbus configuration in the Fieldbus Editor.
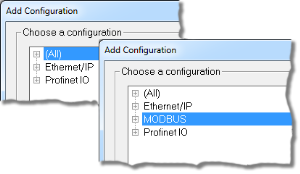
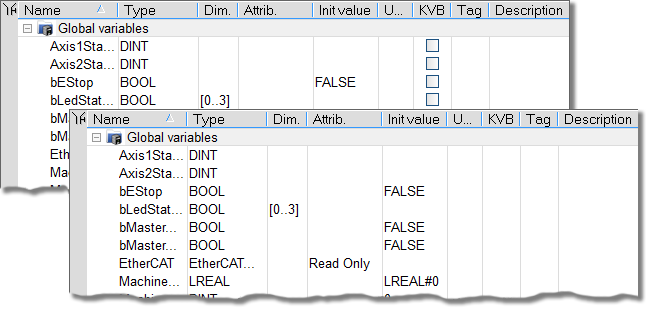
- If Other Modbus devices is selected then the KVB checkbox for Dictionary items will be hidden. Motion configuration will need to be added from the Fieldbus Editor.
- If KVB Panel is selected there will be no node to add a Modbus configuration in the Fieldbus Editor.
- Click OK.